There are voice training programs for many areas of singing:
- Vocal training with complex scales to increase dexterity
- Training the voice with techniques to expand range and increase strength
- Voice training to resolve Pitch problems
For hundreds of years there have been vocal voice training programs that aid singer with the first two types of training the voice. However, until the last four years, there has been little to help vocalists with intermittent and persistent vocal pitch problems.
Types of pitch problems
- Perhaps the most common type of pitchy voice is having chronic flat or sharp pitch on many notes, within most parts of one’s range. This condition can affect even singers who practice on a regular basis and even professional vocalists. PitchPerfector™ software for singing can virtually eliminate all of these problems, by following a simple vocal voice training system.
- A related type of pitch problem is that many notes in a range and key are highly accurate, but some scale degrees may be consistently sharp or flat. In some cases the pitch error occurs only within the context of approach. For example, when singing a major triad arpeggio, you discover that you are consistent flat on the third scale degree and sharp on the fifth scale degree. The PitchPerfector™ voice training system teaches you how to analyze and detect these problem areas and then provides exercises to remedy the pitch errors.
- A less common situation is to find a singer who sings virtually on pitch, most of the time. However, even excellent singers can have bad pitch days caused by weather, cold, allergies, and even excessive types of food or alcohol. For these singers, it is recommended that they check their pitch with singing software prior to major vocal performances.
- The first type of voice pitch problems are related to completely missing notes by wide degrees of error as if singing in the wrong key. Correcting this type of pitch problem requires vocal training that focuses on runs and leaps within a given key. Software for singing can help significantly with these problems.
- Another type of pitch problem arises from having physical complications that prevent a singer from determining pitch. These people may be referred too as tone deaf, though the situation is less common than many people realize, being less than 1% of the population. Vocal software is unlikely to help this condition.
Solution – The PitchPerfector™ Voice Training System Trains Singers to Sing on Pitch
This vocal training system includes singing software that provides real-time visual biofeedback, combined with instruction on how to diagnose your individual pitch problems and fix them.
[include file=”buynow.php”]
Core to this voice training system are step by step instructions on how to use the software to improve pitch.
Realistically, most people experience noticeable improvements in pitch within just a few minutes of use. However, sustained improvements in broad areas of pitch correction may require regular training for a period of time, followed by maintenance training times. The good news is that most singers can incorporate using PitchPerfector™ with their existing vocal exercises without increasing overall practice time.
How PitchPerfector™ works and features:
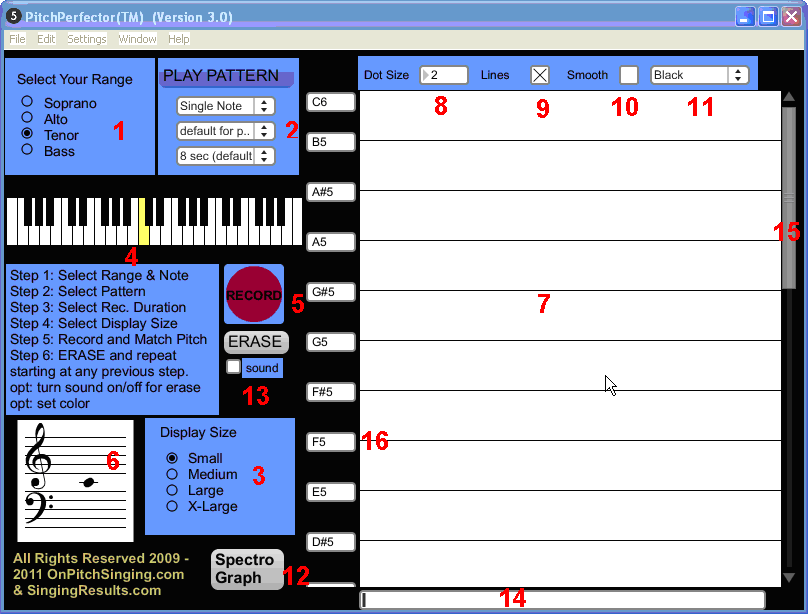
The following numbering refers to the RED numbers in the image above.
1. Select Your Range
Selecting Soprano, Alto, Tenor, Bass will help you determine which notes on the keyboard (below indicated by #4) fit your range. This selection does not “lock you in” but simple shows the note range most common. For example, when you select Soprano the keyboard will play and highlight middle C, C two octaves higher, then the C in the center of the range. If you already know that you are a Soprano, you will now have a good idea of where to start to work on single pitch training.
2. Play Pattern
In this section you have 3 choices.
First, choose a single note, or any of the other patterns of scales and arpeggios, from the following options:
- Single Note
- Short Scale (first 3 notes of major scale)
- Triad (1, 3, 5 scale degrees of major key)
- Octave Arpeggio (major key)
- 5 Note Scale (major key)
- Octave Scale (major key)
- Triad (m) – minor key with flatted 3rd
- 5 Note Scale (m) – minor key with flatted 3rd
- 8 Note Scale (nm) – natural minor scale, flatted 3rd, 6th, 7th
- 8 Note Scale (hm) – harmonic minor scale with flatted 3rd, 6th, raised 7th
- 8 Note Scale (mm) – melodic minor 6th & 7th are raised on ascending and flatted on descending
- Chromatic Scale – ascends by half step
- Whole Tone Scale – ascends by a whole step
These selections are considered progressively more challenging and many singers may have no interest or need to work with chromatic or whole tone scales. See recommendations for usage later in this document.
Notice that when selection a pattern, the display grid reformats. Notes that are part of your target pattern have a double line and notes not on your target have single lines.
Second, choose “default for pattern” or “2 Octaves + 2”.
The “default for pattern” is most common and reformats the grid based on the pattern selected and the selected starting note (remember that your Range was identified in #1, yet you can choose any starting pitch by simply selecting the desired starting note on the keyboard).
“2 Octaves + 2” – this option ignores the patterns and is used by advanced singers who are working on custom patterns and phrases.
Third, choose your recording time of 8, 16, 24, or 32 seconds. It is recommended that you become masterful with most patterns at shorter durations of 8 and 16 seconds, before proceeding to longer recording intervals of 24 and 32 seconds.
Caution: It is tempting for singers to want to jump in and sing an entire song. However, singing an entire song does virtually nothing for training you to sing on pitch. The recording times of 24 and 32 seconds are only for advanced vocalists working on longer phrases. Please see the in depth discussion below for better understanding why you should stick to shorter recording times during early training.
3. Display Size
PitchPerfector™ supports 4 grid display sizes to enable users to visual their pitch.
- Small – 400×500 (supports 8 seconds record time without scrolling)
- Medium – 800×600 (supports 16 seconds record time without scrolling)
- Large – 1200×800 (supports 24 seconds record time without scrolling)
- X-Large – 1540×1040 (supports ~32 seconds record time without scrolling)
Keep in mind that if you have a smaller monitor that does not support these larger sizes, there are scrollbars on the sides for horizontal and vertical scrolling.
4. Keyboard
The keyboard is where you select the starting pitch for the indicated pattern.
5. Record / Erase
After selecting a pattern and hearing the pattern, Press the Record button and begin singing. If you want to stop singing prior to the end of the selected recording time (#2 above), simply click the Record button again. Click the ERASE button to clear the display grid and begin again.
Note: you may record over the same session without Erasing. This may be especially useful when choosing a different recording color (see #11).
[include file=”buynow.php”]6. Staff Display
During record mode, your pitch is graphed on the display and is also indicated on the Staff Display on a note by note basis (that is, not at the fine grain detail of the graph display). The Staff Display can be especially useful to determine that you may be singing at an octave higher or lower than intended. For example, if you where attempting to sing middle C and nothing was showing up on the Display Graph, you might notice that you are singing an octave below or above the intended pitch and simply be outside of the current visual range of the Display Graph.
7. Display Graph
This is where your pitch is graphed in fine grain detail. Watching this graph, while singing patterns, is the key to effective training.
8. Dot Size
A dot size of 2 seems to work best, though you may select a size of 1 or 3. To change the value, click on the number and move your mouse up or down.
9. Lines
Checking this option draws a line between the dots and for many this display is more helpful.
10. Smooth
If you find that your voice is flittering around too rapidly, the smooth option averages the last few sample frequencies so that the overall graph is smoother.
11. Color Selection
Select Black, Red, Green, or Blue for graphing your voice. It may be helpful to repeat the same exercise, or pattern, 4 times in a row, using different colors, and comparing results.
12. SpectroGraph (beta version 0.9)
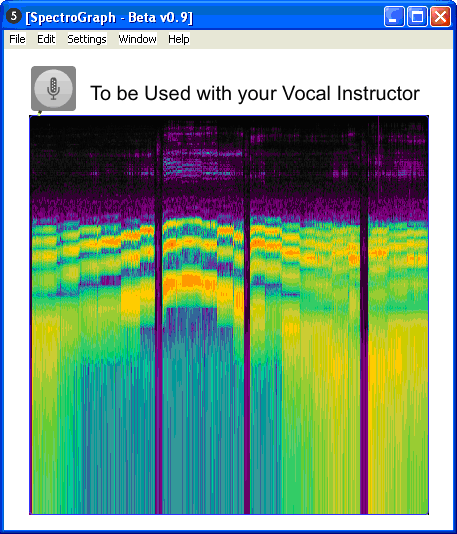
The SpectroGraph is a powerful tool for visualizing a vast array of vocal attributes, including the overtone series which represents your unique voice and tone quality. This advanced feature is described more fully and with more configuration options in the Teacher edition of PitchPerfector™. When working with a trained voice teacher, your teacher will help you understand how to use SpectroGraph to match proper tone quality when working in your home studio.
This is a new feature in PitchPerfector™ 3.0 and SpectroGraph is currently in late stages of Beta testing (version 0.9). If you are a voice instructor, contact us to learn more about how to use this powerful feature with your vocal students.
13. Sound
Turns on/off the automatic replay of the pattern after clicking Erase.
14. Horizontal Scrolling
Scroll to view areas outside of the current view. This would primarily be used when working with smaller Display Sizes.
15. Vertical Scrolling
Scroll to view areas outside of the current view. This would primarily be used when working with smaller Display Sizes and 2 Octaves + 2 advanced mode.
[include file=”buynow.php”]


